Connect shower to mains water supply with the appropriate dual check valve, isolation valve and pressure limiting valve Installed in an easily accessible location within 1.0 m of the shower unit.
An isolation valve (for emergency shut off) on the supply line of each embellishment.
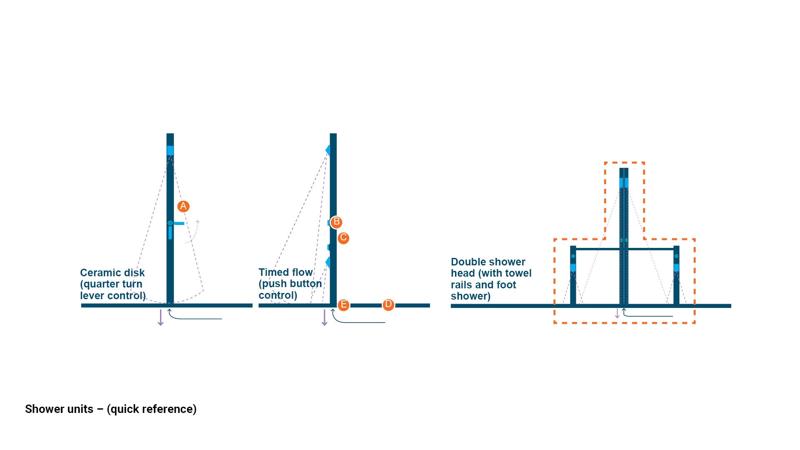
Note: Further guidance and clarification of the content on this page, can be found in the relevant sections of this information sheet.
2. Soakage trench where dunal discharge is not feasible. A soakage trench must be positioned away from foot traffic (as it can compact the area), and away from tree roots and underground services. Must be machine accessible for maintenance.
3. Open space discharge or 4. Piped to dunal areas.
Discharging wastewater into stormwater is NOT accepted
Connect shower to mains water supply with the appropriate dual check valve, isolation valve, pressure limiting valve and downstream of water meter. Installed in an easily accessible location within 1.0 m of the shower unit.
An isolation valve (for emergency shut off) on the supply line of each embellishment.
Note: Further guidance and clarification of the content on this page, can be found in the relevant sections of this information sheet.
Page payload data
This component is currently in development
Sunshine Coast Open Space Landscape Infrastructure Manual (LIM) DISCLAIMER
Disclaimer
Information contained in this document may change without notice and you should use the current material available from Council’s website and not rely on material previously printed or stored by you.
All figures and diagrams are intended to be used as an aid to design and include Council’s preferred elements but they are not intended to be prescriptive and may need to be varied as dictated by site specific factors. While Council has exercised reasonable care in preparing this document, it does not warrant or represent that it is accurate or complete. The Council will not accept responsibility for any loss, damage, cost or expense that you may incur as a result of the use of or reliance upon any material contained in this document.
This document is produced to convey general information and is not intended to constitute advice whether professional or legal. Any reference to legislation in this document is not an interpretation of the law. It is to be used as a guide only. Consult relevant authority websites for current documents, revisions and amendments.
Where a particular product or supplier is profiled in this document, Council is NOT nominating this product or supplier as the selected choice. Product/supplier information has been provided to allow users to source products which contain the correct elements required for Council embellishments. Each product profiled states ‘or equivalent’ which means that different products may be supplied provided they satisfy the identified performance criteria, recommended standards, equal access guidance and product specifications.
Product design, manufacture and installation requires appropriately qualified people to provide site specific solutions to ensure the embellishment is appropriately adapted to local conditions and data.
This document does not override requirements stipulated in a development approval. Project specific variations may be appropriate as a result of site, environmental or other constraints. Any variations to these standards must be approved in writing by council prior to commencement of variation works. Components of this document may be used within a contract document but users should undertake their own investigations to confirm the information is suitable for this purpose.
Drawings contained in this document are NOT FOR CONSTRUCTION.
Details in this document are deemed to be the minimum standard and the user may wish to apply a higher standard subject to approval by council.
Acknowledgements
Council wishes to thank all contributors and stakeholders involved in the development of this document.
Copyright
Sunshine Coast Regional Council (Council) supports and encourages the distribution of its material however, copyright protects this document. Council has no objection to this material being reproduced but only if council is recognised as the owner of the copyright and this material remains unaltered.